概述
本文详细描述了“2台主机+1个虚拟ip搭建nfs文件服务器主备节点”的步骤,架构如下图所示。
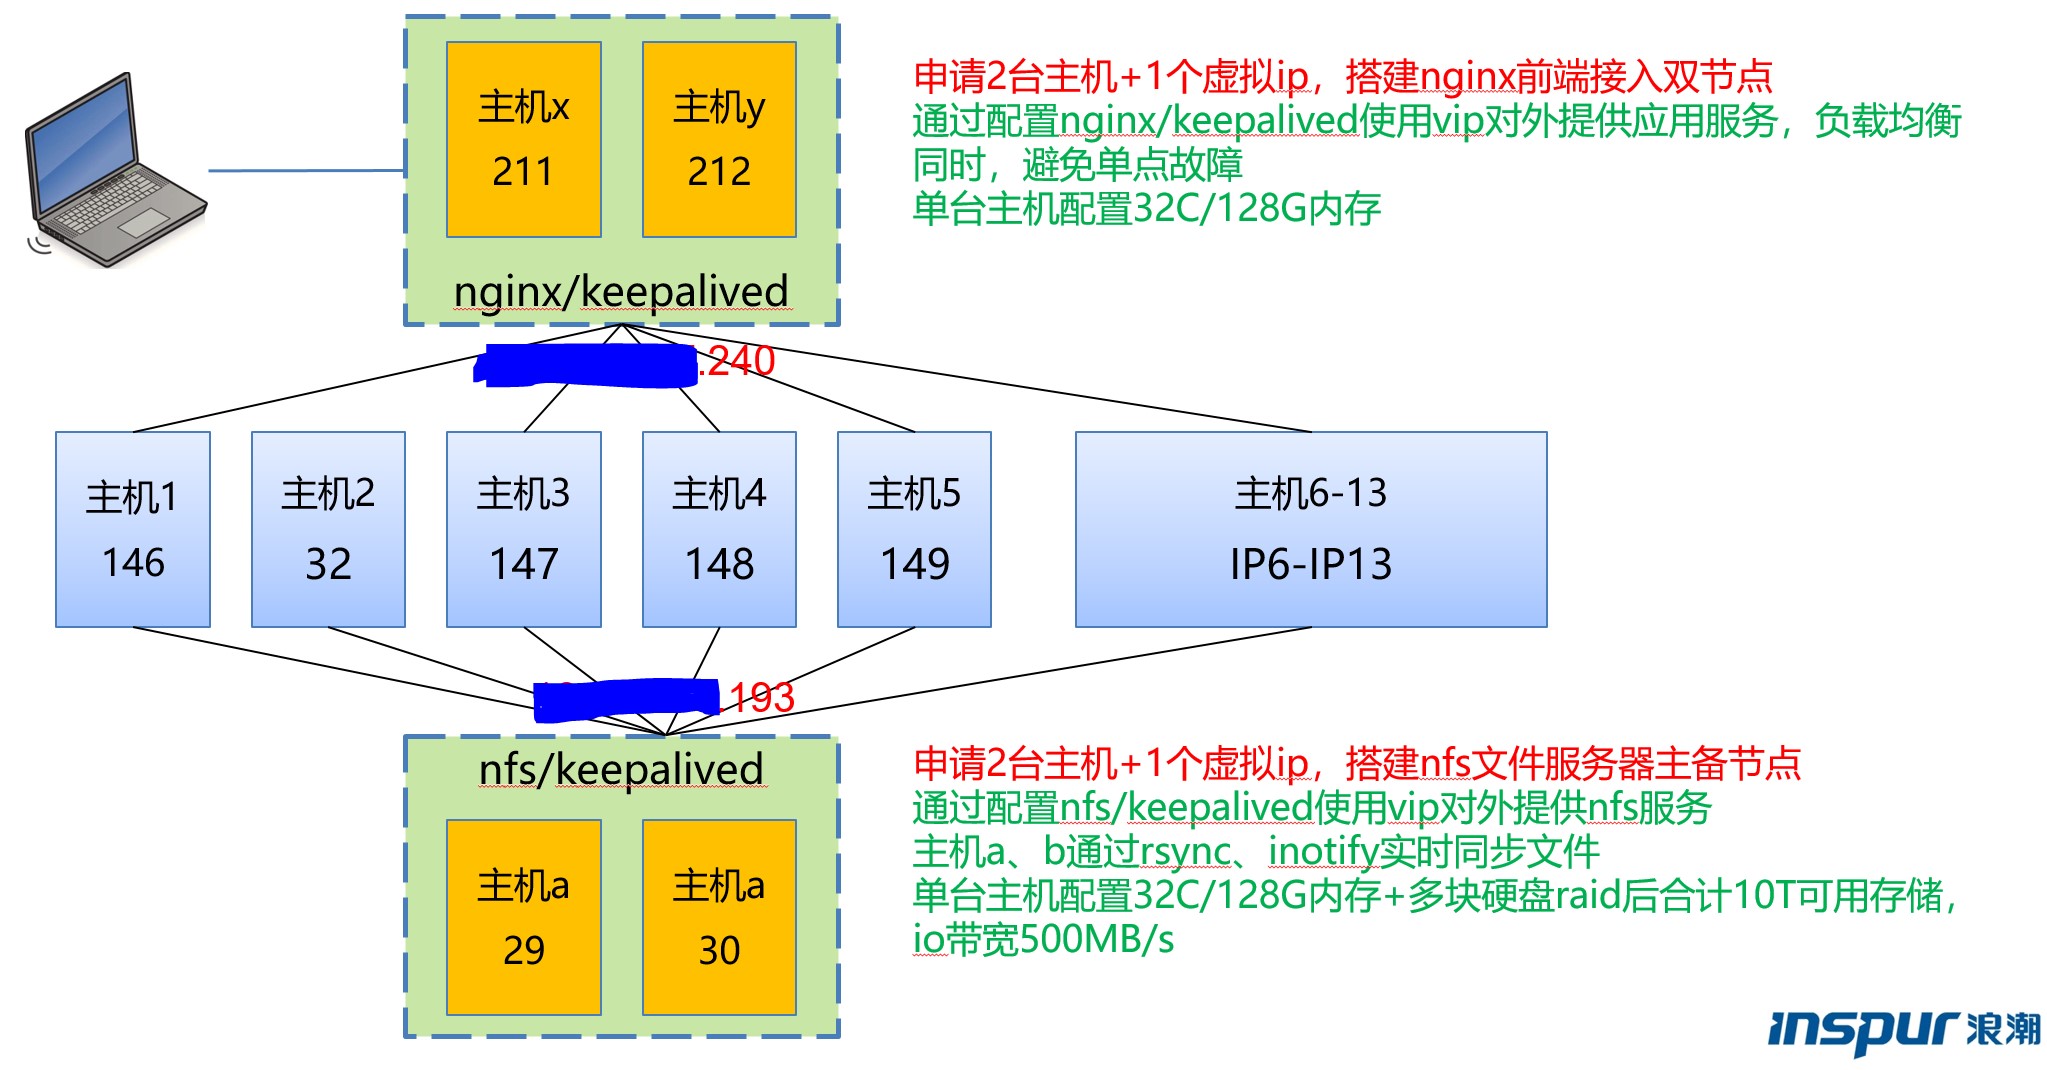
软件安装说明如上图所示:
- 主机29,30需安装keepalived,配置并启动nfs服务
- 146-149为 nfs客户端,nfs服务端地址使用29,30虚拟ip地址
- 主机211,212上均需要安装nginx、keepalived,对外发布keepalived中配置的虚拟ip
一、 linux分区并搭建nfs
1.1linux分区
■格式化磁盘
#lsblk
NAME             MAJ:MIN RM   SIZE RO TYPE MOUNTPOINT
sda                8:0    0 278.5G  0 disk
├─sda1             8:1    0   500M  0 part /boot
├─sda2             8:2    0    91G  0 part
│├─vgroot-lv01  253:0    0    20G  0 lvm  /
│├─vgroot-swap  253:1    0     1G  0 lvm  [SWAP]
│├─vgroot-lv04  253:2    0    20G  0 lvm  /usr
│├─vgroot-ibnms 253:4    0     5G  0 lvm  /ibnms
│├─vgroot-lv02  253:5    0    10G  0 lvm  /home
│├─vgroot-lv03  253:6    0    10G  0 lvm  /var
│├─vgroot-lv05  253:7    0    15G  0 lvm  /opt
│└─vgroot-lv06  253:8    0    10G  0 lvm  /tmp
└─sda3             8:3    0    64M  0 part
sdb                8:16   0   4.9T  0 disk
sdc                8:32   0   4.9T  0 disk
单个分区小于2T,使用如下命令:
fdisk /dev/sdb
依次输入:n p 回车回车 w
单个分区大于2T,使用如下命令:
parted /dev/sdb
依次输入:mklabel gpt mkpart primary 0% 100% quit
■创建pv
pvcreate /dev/sdb1
pvs
■创建vg
vgcreate vgnfs /dev/sdb1
vgdisplay
■创建lv
lvcreate -L 4.8T -n lv_u1 vgnfs
lvdisplay
■格式化lv
redhat7建议用xfs
mkfs.xfs -f /dev/vgnfs/lv_u1
redhat 6使用ext4
mkfs.ext4 /dev/vgnfs/lv_u1
■挂载
挂载之前,/u1目录必须存在
mount /dev/vgnfs/lv_u1 /u1
■配置开机挂载
vi /etc/fstab
/dev/mapper/vgnfs-lv_u1 /u1xfs defaults 1 2
■测试文件系统/u1目录读写速度
测试写:
sync;date;time bash -c "(dd if=/dev/zero of=/u1/tmdd bs=8k count=1000000;sync;date)"
测试读:
sync;echo 3 > /proc/sys/vm/drop_caches;date;time bash -c "(dd if=/u1/tmdd of=/dev/null bs=8k count=1000000;sync;date)"
1.2配置nfs服务端
修改nfs服务端配置文件/etc/exports
vi /etc/exports
/u1 10.209.157.0/24(rw,sync,no_root_squash)
/u1是共享目录
10.209.157.0/24是允许157网段挂载
配置完后重启nfs服务:
redhat6:
service nfs restart
redhat7:
systemctl restart nfs
1.3配置nfs客户端
在客户端使用root用户进行挂载,执行挂载命令:
mount -t nfs -o soft,intr,timeo=2,retry=5 10.209.66.111:/u1 /u1
为防止nfs客户端挂载丢失,可配置定时任务,10.209.66.111该ip为nfs服务端ip:
( * /etc/chk_nfs_client.sh 10.209.66.111:/u1 /u1 >> /var/log/chk_nfs.log 2>&1 &)
定时脚本: # vi /etc/chk_nfs_client.sh #!/bin/bash stat=df -h|grep $2|wc -lif [ $stat -eq 0 ]; then /usr/sbin/lsof|grep $2|awk '{print "kill -9 "$2}'|sh sleep 1 umount -f $2 sleep 1 mount -t nfs -o soft,intr,timeo=2,retry=5 $1 $2 if [df -h|grep $2|wc -l-eq 0 ];then echo "Error while mount $1 to $2, pls check it!" >> /var/log/chk_nfs.log fi fi
二、安装keepalived
2.1下载keepalived
http://www.keepalived.org/download.html
2.2安装keepalived
上传安装文件keepalived-2.0.13.tar.gz到/home/aqgk目录,切换到root用户执行以下指令进行安装。
cd /home/aqgk
chmod 777 keepalived-2.0.13.tar.gz
tar zxvf keepalived-2.0.13.tar.gz
cd keepalived-2.0.13
./configure --prefix=/usr/local/keepalived --sysconf=/etc
如报以下错误,请安装libnl-devel,以redhat7为例:下载libnl-devel-1.1.4-3.el7.x86_64.rpm,执行rpm -ivh libnl-devel-1.1.4-3.el7.x86_64.rpm --nodeps进行安装,安装成功后重新执行configure,无报错后继续执行make
make
make install
cp /usr/local/keepalived/sbin/keepalived /sbin/
cp /home/aqgk/keepalived-2.0.13/keepalived/etc/init.d/keepalived /etc/rc.d/init.d/keepalived
chkconfig --add keepalived
■主节点配置
# cat /etc/keepalived/keepalived.conf
vrrp_script chk_nfs {
  script "/etc/keepalived/chk_nfs_server.sh /u1"#自定义检查脚本
  interval 2 # every 2 seconds#脚本每2秒执行一次
  weight 2 # add 2 points if OK
}

vrrp_instance VI_1 {
  interface bond0.1066 #网卡名称,执行ip a指令,当前配置ip所在网卡名称
  state MASTER #主节点配置MASTER,备用节点配置BACKUP
  virtual_router_id 193# 主备节点需要配置相同的id,0-255,同网段标识
  priority 100 #主节点配置100,备用节点配置90

  virtual_ipaddress {
    10.209.66.193 #虚拟ip地址
  }

  track_script {
    chk_nfs
  }
}
■备用节点配置
# cat /etc/keepalived/keepalived.conf
vrrp_script chk_nfs {
  script "/etc/keepalived/chk_nfs_server.sh /u1"
  interval 2 # every 2 seconds
  weight 2 # add 2 points if OK
}

vrrp_instance VI_1 {
  interface bond0.1066 # interface to monitor
  state BACKUP # MASTER on node1, BACKUP on node2
  virtual_router_id 193 # set another id in same ip_address range!
  priority 90 # 100 on node1, 90 on node2

  virtual_ipaddress {
    10.209.66.193 # virtual ip address
  }

  track_script {
    chk_nfs
  }
}
■自定义检查nfs服务脚本, 在nfs服务端keepalived中配置
# cat /etc/keepalived/chk_nfs_server.sh #!/bin/bash stat=showmount -e localhost|grep $1|wc -lif [ $stat -eq 0 ]; then /bin/systemctl stop nfs /bin/systemctl start nfs sleep 1 if [showmount -e localhost|grep $1|wc -l-eq 0 ];then #keepalived停止脚本 /bin/systemctl stop keepalived fi fi
■自定义检查nginx,在nginx服务端keepalived中配置
# cat /etc/keepalived/chk_nginx.sh #!/bin/bash stat=ps -C nginx --no-header | wc -lif [ $stat -eq 0 ]; then #nginx启动脚本 /opt/tengine2/nginx/sbin/nginx sleep 3 if [ps -C nginx --no-header | wc -l-eq 0 ]; then #keepalived停止脚本 service keepalived stop fi fi
■■先启动主用机器的keepalived,再启动备用机器的keepalived,启动脚本参考如下:
■redhat7
//重新加载服务
systemctl daemon-reload
//配置开机启动
systemctl enable keepalived
//配置不开机启动
systemctl disable keepalived
//启动服务
systemctl start keepalived
//查看服务状态
systemctl status keepalived
//停止服务
systemctl stop keepalived
//重启服务
systemctl restart keepalived
■redhat6
//设置开机启动
chkconfig keepalived on
//设置不开机启动
chkconfig keepalived off
//启动服务
service keepalived start
//查看服务状态
service keepalived status
//停止服务
service keepalived stop
//重启服务
service keepalived restart
2.3测试keepalived
在主备用机器上执行
ip a
查看虚拟ip在主用机器上
手工停止主用机器上keepalived服务,稍等几秒可以看到虚拟ip加到备用机器上:
redhat7:
systemctl stop keepalived
redhat6:
service keepalived stop
手工启动主用机器上keepalived服务,虚拟ip会回到主用机器上:
redhat7:
systemctl start keepalived
redhat6:
service keepalived start
三、安装实时同步
说明:该安装教程是基于同步两台主机/u1目录为目标编写的。
3.1下载rsync
检查rsync是否已安装
rpm –qa|grep rsync
如果没有安装,下载rsync的rpm包
http://rpmfind.net/linux/rpm2html/search.php?query=rsync
redhat6搜索el6下载,redhat7搜索el7下载
3.2安装rsync
rpm -ivh rsync-*.rpm–-nodeps
■节点1、2配置:
#vi /etc/rsyncd.conf
uid = root
gid = root
use chroot = no
max connections = 20
pid file = /var/run/rsyncd.pid
log file = /var/log/rsyncd.log
exclude = lost+found/
transfer logging = yes
timeout = 900
ignore nonreadable = yes
dont compress = *.gz *.tgz *.zip *.z *.Z *.rpm *.deb *.bz2
[u1]
path = /u1
comment = u1
ignore errors
read only = no
write only = no
list = no
auth users = jknfs
secrets file = /etc/rsyncd.passwd
hosts allow = *

#echo 'jknfs:jknfs!@34' > /etc/rsyncd.passwd
#chmod 600 /etc/rsyncd.passwd
#echo 'jknfs!@34' > /etc/rsyncd.passwd2
#chmod 600 /etc/rsyncd.passwd2
■测试同步:
在节点1主机/u1目录下新建测试文件,执行同步命令,替换指令中IP为节点2IP地址:
rsync -auv --delete /u1/ jknfs@IP::u1/ --password-file=/etc/rsyncd.passwd2
以上指令是从节点1到节点2同步,交换目录可实现从节点2到节点1同步
rsync -auv --delete jknfs@IP::u1/ /u1/--password-file=/etc/rsyncd.passwd2
3.3下载inotify-tools
下载地址:https://github.com/rvoicilas/inotify-tools/wiki
3.4安装inotify-tools
tar zxvf inotify-tools-3.14.tar.gz
chmod -R 777 inotify-tools-3.14
cd inotify-tools-3.14
./configure
make
make install
#vi /etc/rsync.sh
#!/bin/bash
/usr/local/bin/inotifywait -mrq -e create,delete,modify,move,attrib $1 | while read file
do
  rsync -auv --delete --exclude=*.tar --exclude=*.zip --exclude=*.gz --exclude=*.out --password-file=/etc/rsyncd.passwd2 $1 $2
  echo "${file} 在 date +'%F %T %A' 成功同步到 $2" >> /var/log/rsync.log
done
chmod u+x /etc/rsync.sh
■启动实时同步:
nohup /etc/rsync.sh /u1/ jknfs@IP::u1/ &
■查看同步日志:
tail -f /var/log/rsync.log
■同步过程中发现程序会掉,配置守护程序:
# vi /root/rsync.sh
#!/bin/bash
stat=ps -C rsync.sh --no-header | wc -l
if [ $stat -eq 2 ]; then
  echo 'rsync process ok'
elif [ $stat -eq 1 ]; then
  ps -ef|grep rsync.sh|awk '{print "kill -9 "$2}'|sh
  sleep 10
  nohup /etc/rsync.sh /u1/ jknfs@10.209.66.30::u1/ &
elif [ $stat -eq 0 ]; then
  nohup /etc/rsync.sh /u1/ jknfs@10.209.66.30::u1/ &
fi
chmod u+x /root/rsync.sh
■将守护进程配置到定时任务:
crontab -l
/1 * sh /root/rsync.sh

文章评论